01. Portenta X8 User Manual
Get a general overview of Portenta X8 and its features.
Introduction
Portenta X8 is a powerful, industrial-grade System on a Module with Linux OS preloaded onboard that can run device-independent software thanks to its modular container architecture.

In this user manual, we will go through the foundations of the Portenta X8 to help you understand how the board works and how you can benefit from its advanced features.
Required Hardware
- Portenta X8 (x1)
- USB-C® cable (USB-C® to USB-A cable) (x1)
- Wi-Fi® Access Point or Ethernet with Internet access (x1)
Required Software
- For Linux programming, leverage the latest Linux image available, and check this section to verify if your Portenta X8 has already been updated.
- For Arduino programming, leverage Arduino IDE 1.8.10+, Arduino IDE 2, or Arduino Web Editor, and the latest Arduino Mbed OS Portenta Boards Core > 3.0.1.
Product Overview
The Portenta X8 combines the best of two approaches, offering the flexibility of Linux and the capability for real-time applications within the Arduino environment. Developers can execute real-time tasks while simultaneously handling high-performance processing on Linux cores.
So, let's have a look at its technical specifications.
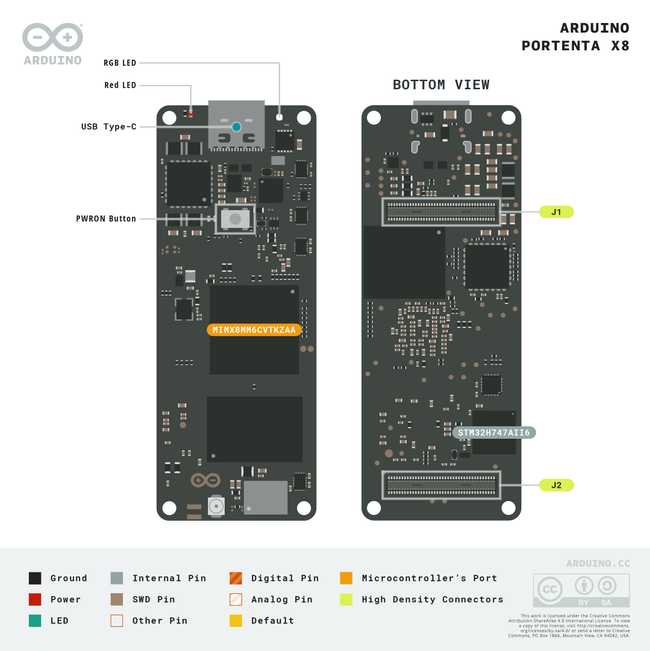
Board Architecture Overview
Portenta X8 is a powerful, industrial-grade System-on-Module (SoM) that combines a Yocto Linux distribution with the well-known Arduino environment.

As reported in the image above, Portenta X8 features two powerful computing units:
NXP® i.MX 8M Mini Cortex®-A53 quad-core up to 1.8GHz per core + 1x Cortex®-M4 up to 400 MHz. This microprocessor is the one where the Yocto Linux distribution is running together with Docker containers (check this section of this user manual to learn more).
STMicroelectronics STM32H747AII6 featuring 1x Arm® Cortex®-M7 core running up to 480 MHz and 1x Arm® Cortex®-M4 core running up to 240 MHz. This microcontroller hosts the "Arduino Mbed OS Portenta Boards" Core. M4 core is accessible and programmable by the user, while M7 is dedicated to establishing and guaranteeing the communication between i.MX 8M Mini and M4, as well as to manage peripherals through RPC. For more details, refer to this section of the user manual.
The two computing units are responsible for different tasks, which are summarized in the table below.
| NXP® i.MX 8M Mini | STMicroelectronics STM32H747AII6 |
|---|---|
| Running Yocto Linux distribution with Docker containers | Running Arduino sketches with the Mbed OS Portenta Boards Core |
| Dedicated to high level tasks | Dedicated to real-time tasks |
| Manage network connectivity | No direct connection to any network stack |
| Manage network-based buses (e.g., Modbus TCP, etc.) | Manage field buses (e.g., Modbus RTU, CANbus, etc.) |
| Access to peripherals without concurrent access control | Access to peripherals without concurrent access control |
In addition to the above features, here is an overview of the board's main components:
External memory: The board features an onboard 16 GB eMMC Flash memory and 2 GB Low Power DDR4 DRAM.
Wireless connectivity: The board supports 2.4 GHz Wi-Fi® (802.11 b/g/n) and Bluetooth® 5.1, provided by the Murata® 1DX module. This high-performance Wi-Fi® and Bluetooth® module allows the Portenta X8 to communicate wirelessly with other devices and systems.
Ethernet connectivity: The board features an onboard, high-performance 1 Gbps Ethernet transceiver accessible through its High-Density connectors.
Secure element: The board includes a ready-to-use secure element, the SE050C2 from NXP®, tailored for IoT devices and offering advanced security features. This allows Portenta X8 to achieve PSA certification from ARM®. For more information, click here.
USB connectivity: The board features a USB-C port for power and data, which is also accessible through the board's High-Density connectors. This port is linked to a MIPI to USB-C/DisplayPort converter, enabling video output through the USB-C connection.
Power management: The Portenta X8 includes a power management integrated circuit (PMIC) to meet the demands of always-connected IoT devices.
Pinout
The full pinout is available and downloadable as PDF from the link below:
Datasheet
The full datasheet is available and downloadable as PDF from the link below:
Schematics
The full schematics are available and downloadable as PDF from the link below:
STEP Files
The full STEP files are available and downloadable from the link below:
Features Overview
Portenta X8 integrates two main programming experiences: the Yocto Linux and popular Arduino environments.

To explore specific sections in more detail, please click on the links below that interest you:
Portenta X8: Linux & Arduino Interoperability
The Portenta X8 runs on a Yocto-based Linux distribution with Docker container support, offering robust capabilities for deploying and managing device independent applications. In addition, it allows users to upload Arduino sketches to the M4 core of the STM32H7 using the Arduino IDE.
This integration leverages a service called
monitor-m4-elf-file.serviceFor more details on Portenta X8’s Linux capabilities, Docker support, and Arduino integration, please refer to the Portenta X8 Fundamentals documentation.
First Use Of Your Portenta X8
You can now start interacting with your Portenta X8. Portenta X8 has an embedded configuration console that will guide you step-by-step in configuring your board.
Power The Board
Connect the Portenta X8 to your PC via a USB-C® cable (either USB-C® to USB-A).
Once connected, you will see the Portenta X8 LEDs start blinking. Portenta X8 features two LEDs, a Power LED, and a Status LED, which can blink in parallel.

The table below describes the meaning and functionalities of LEDs.
| LED Type | Colour | Meaning |
|---|---|---|
| Power LED | Red | Power ON |
| Status LED | White | OS booting in progress |
| Status LED | Blue | Linux Kernel running |
| Status LED | Green | Board connected to the Internet |
| Status LED | Red | STM32H7 LED, blinking when triggered in the IDE |
Setup with the Arduino Linux Wizard
It is recommended that you have your Portenta X8 with the latest OS version. Check this section to learn how to have your Portenta X8 up-to-date.
Once the Portenta X8 is correctly powered up, you can start interacting with it.
Open your browser and navigate to www.arduino.cc/start. The following page will be displayed.

Click on Linux boards and sign in to your Arduino Cloud account. If you do not have an account, create a new one from the same webpage.

When successfully logged in, you will be asked to download the Arduino Create Agent if you have not done so yet. Click on DOWNLOAD.

The agent will be installed on your computer. This activity might take a few minutes. Once installed, your Portenta X8 will be automatically detected by your PC after a few seconds.

Now click on START CONFIGURATION. The tool will install all the required add-ons to make your Portenta X8 work efficiently with your PC via serial communication.
You can now proceed to the setup of the board connectivity by clicking OK, GOT IT.

If you face any issue with this flow or prefer to interact directly with your Portenta X8 through the command line, please refer to this section to learn how to connect with the board leveraging ADB service.
Once the setup is complete, the browser page will automatically switch to the Arduino Linux Wizard page.
The Arduino Linux Wizard page is accessible at http://localhost:8080. You can use this link to open the Arduino Linux Wizard dashboard anytime.

The SYSTEM INFO button is located at the bottom left corner of the Arduino Linux Wizard page.

This section displays details about the Portenta X8, such as hardware and software specifications, network status, and active containers.
If you disconnect the Portenta X8 and need to reopen the Arduino Linux Wizard page, use the command line and run the TCP port forwarding command:
1adb forward tcp:8080 tcp:80Then, access the page with http://localhost:8080 to open the Arduino Linux Wizard dashboard.
Wi-Fi® Configuration
Click Wi-Fi® Connection to start configuring your network connectivity. The Portenta X8 can connect to the network through an Ethernet cable using either a USB-C® hub with an RJ45 port or a Portenta Carrier, via cellular connectivity using a Portenta Carrier and a Pro 4G Module, or through Wi-Fi®. In this tutorial, Wi-Fi® connectivity will be used.

For detailed instructions on using cellular connectivity with the Portenta X8 and a Pro 4G Module, please refer to the Cellular Connectivity with the Max Carrier & Pro 4G Module tutorial or the Cat.4 Modem section of the Portenta Mid Carrier User Manual.
For detailed instructions on using Ethernet connectivity with the Portenta X8 and the RJ45 port of the Portenta Carrier, please refer to the Ethernet section of the Portenta Hat Carrier User Manual or the Ethernet section of the Mid Carrier User Manual.
Choose the WiFi Network option to continue network connectivity configuration with Wi-Fi® connectivity.

Select your Wi-Fi® SSID. You can select a network from the available list or introduce your SSID manually.

Type your Wi-Fi® password.

Once connected, you will get a notification confirming your Portenta X8 has connected to the selected network, and its LED will start blinking green.
Moreover, you can check the network you are connected to in the bottom left section of this dashboard.

Now, you can click OK and be redirected to the Arduino Linux Wizard homepage below.

You can change your network by clicking on the Settings button and repeating the above steps.
Arduino Linux Wizard Homepage
The Arduino Linux Wizard, hosted on the Portenta X8, allows a user to leverage the following capabilities:
- Get board details
- Configure Portenta X8 Wi-Fi®
- Interact with the board through the embedded Python® Alpine Shell
- Provision your device to Arduino Cloud
- Manage the Linux distribution with the dedicated Portenta X8 Board Manager
- Update the board's operating system
Portenta X8 with Python Alpine Shell
Click the Shell button to start using your Portenta X8 with Python-Alpine.

This shell is running in a Python-Alpine container embedded in Portenta X8. You will find multiple examples under the directory
/root/examplesapk add <packagename>
Portenta X8 OS Image Update
It is recommended that you check every now and then to see if your Portenta X8 image version is up to date to have the latest security updates.
To review the image version history, refer to the Portenta X8 firmware release notes.
There are four ways to update your Portenta X8 are described:
- Update for OS release V.399
- Update through Arduino Linux Wizard experience
- Update through Portenta X8 Manager in your Arduino Cloud for Business account (available for all OS releases)
- Update using the
tool (compatible with custom images)uuu
You can find more details in the dedicated tutorial here: How To Update Your Portenta X8.
Portenta X8 with Arduino Cloud
Note: this is an optional step. The Portenta X8 can also be used with locally without an internet connection.
Making Portenta X8 compatible with Arduino Cloud means opening many new applications. This compatibility is guaranteed by a brand-new Python container, which includes a dedicated Arduino IoT Cloud Python library. Through Arduino Cloud APIs, the Python container ensures full interaction and simple porting of any Python developed application in the Arduino Cloud.
Check all the available Arduino Cloud plans here and create your Arduino Cloud account in a couple of steps (see the dedicated documentation at this link).
With the Arduino Linux Wizard experience, your Portenta X8 can be securely self-provisioned in Arduino Cloud; you need to create API keys, and the Python container running on X8 will do the rest. When provisioned, you can start directly interacting with an example Thing and Dashboard that will be automatically generated to guide you in this new journey.
Click the Arduino Cloud button to start provisioning your Portenta X8 in Arduino Cloud.

Start setting up the device name for your Portenta X8 (in this case, portenta-x8-test) and click on CONTINUE. The same device name will be used and visualized in your Arduino Cloud space, but you can freely change it in the future.

At this point, you will be asked to insert your API Key credentials and Organization ID. Organization ID is optional and should be filled in only if you use a Shared Space in Arduino Cloud for Business.

To get API keys, log into your Arduino Cloud account and select the Space you would like your X8 to be provisioned into.
Thus, click on GENERATE API KEY in your Arduino Linux Wizard dashboard. A new window in your web browser will allow you to log in to your Arduino Cloud space.
If you want to learn more about what API keys are and how they work, please take a look at the dedicated documentation available at this link.

Click on SIGN IN. If you do not have an Arduino Cloud account, create a new one from the same webpage.
Sign in to your Arduino Cloud account by adding your credentials, i.e., Username/email and Password.

You are now logged into your Arduino Cloud space. Go on by clicking on API keys within the account banner in the top right corner.

It is time to generate your API keys. Click on CREATE API KEY in the upper right-hand corner.

Define a name for your API key, in this case, portenta-x8-test-API, and click on CREATE. These API keys are personal and visible only from your account.

At this point, your API key has been created. Save the correspondent credentials in a safe storage space by clicking on download the PDF.
Keep this file safely stored; otherwise, your API credentials cannot be recovered. If you lose it, you will have to generate new API keys by repeating the above procedure.

The PDF file will look like the image below and include the credentials you need to copy and paste into the Arduino Linux Wizard page.

Thus, copy the Client ID and the Client Secret credentials and paste them into your Arduino Linux Wizard dashboard as shown below.

If you are using an Arduino Cloud for Business account with Shared Spaces. In that case, you also need to add the Organization ID you would like your Portenta X8 to be provisioned into by clicking on ADD ORGANIZATION.

To recover the Organization ID, known as Space ID, of your Shared Space on Arduino Cloud for Business, open your Arduino Cloud homepage and navigate to Space Settings > General in the sidebar on the left.

At this point, you can copy the Space ID of your Shared Space and paste it into your Arduino Linux Wizard dashboard together with your API keys.

Click on SETUP DEVICE, and you are ready to go, your Portenta X8 is now provisioned into your Arduino Cloud space.
Once provisioned, the Portenta X8 will be automatically linked to an example Thing and Dashboard. You can freely check them by clicking on the corresponding links embedded in the Arduino Linux Wizard.

As mentioned, Arduino provides an example dashboard that will automatically set up and be visible live after your Portenta X8 has been provisioned. To make this dashboard update its data automatically, you need to go back to your Arduino Linux Wizard and launch the example.
To do so, copying the shown code:
1python3 examples/arduino_iot_cloud_example.pyAnd clicking on Launch Example is sufficient. An Alpine-Python shell will open, and you will have to paste the previous code here to launch the example.

Now, you can navigate to your dashboard here to see your Portenta X8 LED blinking and the live temperature inside the microprocessor.

If you face any issues during the provisioning of your Portenta X8, feel free to repeat the procedure above.
If you would like to customize your Portenta X8 Things/Dashboards with your custom data, check this section of the user manual.
Portenta X8 Board Manager
Note: This is an optional step that enables the possibility of performing remote over-the-air updates on your Portenta X8 OS and applications. To proceed, you need an Arduino Cloud for Business plan with Portenta X8 Manager.
Now, you can start connecting your Portenta X8 to the Portenta X8 Board Manager. You need an Arduino Cloud for your business account to leverage this feature.
Check the Arduino Cloud for business plan with Portenta X8 Manager here and create your Arduino Cloud account in a couple of steps (see the dedicated documentation at this link).
When your Arduino Cloud for business account is correctly set up, log into it here and click on Portenta X8 Board Manager. The feature is located within the Integrations section of the Cloud.

At this point, you will be asked to create a new account on Foundries.io platform. It is recommended to register with the same email address you are currently using in your Arduino Cloud for business account.

Add all your credentials and click on Sign up.

So, let's create your brand new FoundriesFactory. Select Arduino Portenta X8, define a Factory name for your Factory, and then click on Create Factory.

Your FoundriesFactory is correctly set up. As you can see, the Factory does not have any device connected to it.

To provision your Portenta X8, go back to your Arduino Linux Wizard webpage and click on the Portenta X8 Manager button.

Enter the Factory name you have just registered, in this case, user-test, and assign a Board Name to your Portenta X8. This Board Name will be used to correctly identify your Portenta X8 in your FoundriesFactory. You can now click on REGISTER.

To complete the registration of the Board with the FoundriesFactory, copy the code that appeared in your Arduino Linux Wizard.

Click on COMPLETE REGISTRATION to be re-directed to the Foundries.io activation page.
Paste your token in the text box and press Next.
The token code is valid for 15 minutes. If you do not use it in this time span, you will have to repeat all the above registration steps in your Arduino Linux Wizard to generate a new code.

Confirm the addition of your Portenta X8 by pressing Connect.

Go to your FoundriesFactory by clicking on Factories Page.

Now you will see the number of devices associated with your FoundriesFactory to be equal to 1.

Your Portenta X8 is correctly provisioned into your FoundriesFactory.
To verify your device status, click on your FoundriesFactory, go to the Devices section, and check its target update and the installed containers Apps.

You can also check within the Arduino Linux Wizard home screen for factory registration if it was successfully registered.

If you want to learn more about Portenta X8 Manager features, check the dedicated section of this user manual called Working with Portenta X8 Board Manager.
Working with Linux
It is time to start interacting with the Linux OS embedded in your Portenta X8. To do that, you need to open your terminal window and look for ADB inside the directory Arduino15/packages/arduino/tools/adb/32.0.0. The Arduino15 folder may have a different location depending on your Operating System. Check this article to learn where your Arduino15 folder is located.
Android Debug Bridge (ADB) is a tool included in the SDK software (Software Development Kit) and used, among other things, to make an Android device and a computer communicate. To check if ADB is working correctly, you can type
adb devices
If you need to install ADB, you can also download the right tool for your Operating System directly from the official Android website.
If you want to start the embedded Arduino Linux Wizard from the command line, you can continue typing in your terminal:
1adb forward tcp:8080 tcp:80With this command, ADB allows you to forward the requests of your computer's
8080 TCP-IP port80 TCP-IP port
Now you can open your browser, go to http://localhost:8080 and the same Arduino Linux Wizard dashboard will appear to allow you to configure your Portenta X8.
Now, you can type
adb shell
As it is a Linux device, you can create files, change directories, etc.
To gain admin (root) access, type
sudo su -
You can now freely program your Portenta X8 Linux OS. In the sections below, you can check out some basic commands to get started.
Manage Your Network Via CLI
To connect to a Wi-Fi® Access Point via CLI, you can use the network manager tool nmcli. These are some of the most used commands:
to connect to a specific SSIDnmcli device wifi connect <SSID> password <PASSWORD>
to check the connection statusnmcli de
to visualize the active network interfaces (and their types) on your Portenta X8nmcli connection show
Accessing Over SSH Session
Establishing communication with the Portenta X8 via an SSH session is possible. To do so, a network connection is needed, either over Wi-Fi® , cellular or Ethernet. Using a device with DHCP server capabilities, such as a network router, is recommended for Ethernet connections. After setting up the network connection and DHCP, the Portenta X8 will be ready for SSH communication.
For Windows users, it is necessary to install a service tool to ease the following procedures. While Bonjour, Apple's implementation of zero-configuration networking, comes built into macOS, it is not natively included in Windows and must be installed separately.
Before proceeding on Windows, please install Bonjour Print Services for Windows before continuing the following steps.
For macOS and Linux users, Bonjour is pre-installed on macOS, and Avahi-Browse is typically available on Linux by default. Thus, additional installation steps may be unnecessary for these operating systems.
In the subsequent sections, we will first walk you through the process on Windows, followed by details and instructions for Linux and macOS.
Using the Terminal

The command below is used to browse for SSH services on the local network that are advertised over a multicast Domain Name System (mDNS). This protocol resolves hostnames to IP addresses within small networks without a local name server.
1dns-sd -B _sftp-ssh._tcp localBy executing this command, you can discover devices offering SFTP services (file transfer over SSH) without prior knowledge of their IP addresses or hostnames.
The command lists these services, indicating where an SSH connection can be established for secure file transfers or shell access, helping to ease the identification and utilization of networked devices that support this protocol.

1dns-sd -G v4v6 portenta-x8-<UUID>.localThe command above queries the network for the IPv4 and IPv6 addresses associated with the hostname
portenta-x8-<UUID>.local1dns-sd -G v4v6 portenta-x8-1822aa09dab6fad9.localThis command is handy for finding the IP addresses of devices such as the Portenta X8 that a DHCP server may assign dynamic IP addresses. It simplifies connecting to such devices over the network by providing their current IP addresses.

The following command sends echo requests to the device with the hostname
portenta-x8-<UUID>.local1ping portenta-x8-<UUID>.localThis command helps verify that the Portenta X8 is online and reachable over the network and for diagnosing connectivity issues. The UUID can be ascertained by referring to the findings from an earlier SSH services scan with network query or the ADB shell.

After verifying that the Portenta X8 is accessible using a simple ping test, it is now possible to start an SSH session using the following command:
1ssh fio@portenta-x8-1822aa09dab6fad9.localThe example command above starts an SSH (Secure Shell) connection to the Portenta X8 with the hostname
portenta-x8-1822aa09dab6fad9.localfio1ssh fio@portenta-x8-<UUID>.localWhen executing the command, substitute the
<UUID>If the device is configured correctly to accept SSH connections and the
account exists with SSH access, this command will prompt for the password associated with the fio
user.fio
Upon successful authentication, it will open a secure shell session to the device, allowing for command-line interface access and the execution of commands remotely on the Portenta X8.
The password and the rest of the configuration for using the Portenta X8 inside the shell remain the same.
The process is similar for GNU/Linux and macOS, with minor differences in the initial steps when browsing for SSH services on the local network.
- For GNU/Linux:
Use Avahi-Browse to search for SSH services on the local network:
1avahi-browse -d local _sftp-ssh._tcp --resolve -t- macOS:
On macOS, you can use the similar command:
1dns-sd -B _sftp-ssh._tcp localAlternatively, you can use a software called Discovery, which is available here.
Using Software With GUI
The SSH session can be initialized using third-party software with a Graphical User Interface (GUI) for easy access. An example is a software called Bonjour Browser, which can be downloaded here.

This software simplifies browsing SSH services on the local network advertised over mDNS using a GUI. The image above, for example, shows all available services on the network, including those for the Portenta X8. You can retrieve the IP address information by simply clicking on a service item.
Once the information is verified, you can use that data with software such as PuTTY. PuTTY is a free and open-source terminal emulator, serial console, and network file transfer application. It supports several network protocols, including SSH (Secure Shell) and SFTP (SSH File Transfer Protocol).

In the PuTTY Configuration window, keeping the default values, you must specify the Host Name (or IP address) field with
portenta-x8-<UUID>1portenta-x8-1822aa09dab6fad9Click on
OpenAcceptConnect Once
After verifying the security alert and proceeding, you have an SSH session that has begun communicating with the Portenta X8.

Inspect Real-Time Tasks And Logs Via CLI
Run
journalctl -f
By calling
journalctljournalctl -p 0| Error code | Meaning |
|---|---|
| 0 | Emergency |
| 1 | Alerts |
| 2 | Critical |
| 3 | Errors |
| 4 | Warning |
| 5 | Notice |
| 6 | Info |
| 7 | Debug |
When you specify the error code, it shows all messages from that code and above. For example, if you specify error code 2, it shows all messages with priority 2, 1 and 0.
You can also view logs for a specific time and date duration. You can use the
-- since"yesterday""now""YYYY-MM-DD HH:MM:SS"An example of how to use the command:
1journalctl --since "2022-12-22 12:20:00" --until yesterdayWorking with Docker on Portenta X8
To customize the Portenta X8, you can develop and deploy Docker containers. Start by ensuring Docker is correctly set up on your device. A quick way to test Docker functionality is by running the official
Hello WorldFirst, pull the image using the following command:
1docker pull hello-worldThen, run the container:
1docker run hello-worldThis simple process pulls and runs the
Hello WorldHello World
With this, you can start customizing the Portenta X8 by creating and deploying containers tailored to your needs. For example, you can develop Python applications or other utilities and package them into Docker containers for deployment.
You can explore Arduino's Docker Hub for a repository of preconfigured Docker images designed to simplify development on the Portenta X8.
Build Your Container
You can create your custom containers and build them inside the Portenta X8. Since Portenta X8 is based on an arm64 architecture, you can use the command
build1docker build . -t x8-custom-develOtherwise, if you are using a different architecture or building machine, use the
buildx1docker buildx build --platform linux/arm64 -t x8-custom-devel --load .This way, your Docker image will be built and tagged with the name
x8-custom-develIt is time for you to deploy the newly created Docker image. To do so, save it somewhere and deploy it on your Portenta X8.
Managing Early Start Services When Building Custom Containers
The Portenta X8 firmware includes the
, which starts certain Docker Compose applications early during the boot process. This feature helps pre-configured services run smoothly but may sometimes interfere with custom containers you pull or build.compose-apps-early-start.service
For example, system tools like Skopeo may automatically remove containers without warning. This can happen to containers pulled from external sources or locally built on the device. If you notice that your custom containers are being removed unexpectedly, you can solve this by managing the system services with a few command lines.
To prevent automatic container removal and ensure your custom containers stay intact, the early start services can be stopped and disabled by running the following commands in the ADB shell:
1systemctl stop compose-apps-early-start.service2systemctl stop compose-apps-early-start-recovery.service3systemctl disable compose-apps-early-start.service4systemctl disable compose-apps-early-start-recovery.serviceAlternatively, you can use this single line of command:
1systemctl stop compose-apps-early-start.service && systemctl stop compose-apps-early-start-recovery.service && systemctl disable compose-apps-early-start.service && systemctl disable compose-apps-early-start-recovery.serviceStopping and disabling these services will prevent the early start of compose applications, ensuring your custom containers are not removed automatically. Additionally, make sure to check for the latest firmware image to maintain compatibility and optimal performance of the Portenta X8 with custom container developments.
Deploy Your Container With Docker Hub
If you have a Docker Hub account, you can freely upload your Docker image to your registry (e.g.,
yourhubusername1docker push yourhubusername/x8-custom-develYour image is now available in your Docker Hub registry
yourhubusernameAt this point, you can directly pull the image to your Portenta X8. To do so, connect to your Portenta X8 through ADB. It can be found at
Arduino15\packages\arduino\tools\adb\32.0.0You can pull the image from that directory to the preferred location.
1adb shellWith the Portenta X8's terminal, the following command is used.
1docker pull x8-custom-develNow, your image is correctly deployed on your Portenta X8.
Deploy Your Container Without Docker Hub
If you do not have a Docker Hub account, you can also save the Docker container locally as a .tar file. Then, you can easily load that to an image.
You can use the 'docker save' command to save a Docker image after you have built it. For example, let's save a local copy of the
x8-custom-devel1docker save x8-custom-devel:latest | gzip > x8-custom-devel_latest.tar.gzAt this point, you can directly pull the image to your Portenta X8. To do so, connect to your Portenta X8 through ADB. It can be found at
Arduino15\packages\arduino\tools\adb\32.0.01docker import /home/fio/x8-custom-devel_latest.tar.gz x8-custom-devel:latestNow, your image is correctly deployed on your Portenta X8.
Launch Your Container
To launch your brand new image, you need to create a new
docker-compose.ymldocker-compose.yml1cd /var/sota/compose-apps/arduino-ootb && docker compose stopYou can now create the path for the new
docker-compose.yml1mkdir /var/sota/compose-apps/custom-devel && cd /var/sota/compose-apps/custom-devel && touch docker-compose.ymlBefore uploading, open the
docker-compose.yml1services:2 custom:3 container_name: custom-devel4 hostname: "portenta-x8"5 image: x8-custom-devel:latest6 7 restart: unless-stopped8 tty: true9 read_only: false10 user: "0"11 volumes:12 #- '/dev:/dev'13 - '/run/arduino_hw_info.env:/run/arduino_hw_info.env:ro'14 - '/sys/devices:/sys/devices'15 - '/sys/class/pwm:/sys/class/pwm'16 - '/sys/bus/iio:/sys/bus/iio'17 - '/var/sota:/var/sota'18 - './keys:/tmp/keys:ro'19 devices:20 - '/dev/gpiochip5'21 - '/dev/tee0'It is now time to upload the new
docker-compose.yml1docker compose up --detachAnd you are ready to go! Your Portenta X8 Dashboards and Things can be customized using the same process multiple times.
If you are using the Portenta X8 Manager, go to this documentation to learn how to upload the newly created container in your FoundriesFactory.
In-Depth Docker Container Management On Portenta X8
We created dedicated tutorials covering this topic. Go check them out:
- Managing Containers with Docker on Portenta X8
- Deploy a Custom Container with Portenta X8 Manager
- Running Wordpress & Database Containers on Portenta X8
Output Video Content On A Screen
The USB-C® port on your Portenta X8 supports video output. Consequently, you can connect a USB-C® monitor or a USB-C® to the HDMI hub to your Portenta X8 to start visualizing video or other visual renders.
Here you can find a list of validated compatible USB-C® to HDMI hubs:
Learn more on how to output WebGL content on a screen with Portenta X8 by checking the dedicated tutorial.
Build A Custom Image For Portenta X8
You may want to build a custom image for the Portenta X8 with the source code provided in the public GitHub repository of lmp-manifest. Building an image locally can help debug certain aspects of the system, such as the bootloader or kernel support.
Have a look at this dedicated tutorial to understand how to build your own custom image.
Using the Integrated Overlay Configurator
tenta-config is a configuration tool for managing hardware settings and device tree overlays on compatible carriers. It provides a graphical interface for customizing system configurations with compatible carriers, such as peripheral management, adjusting video output settings, and managing pin mappings.
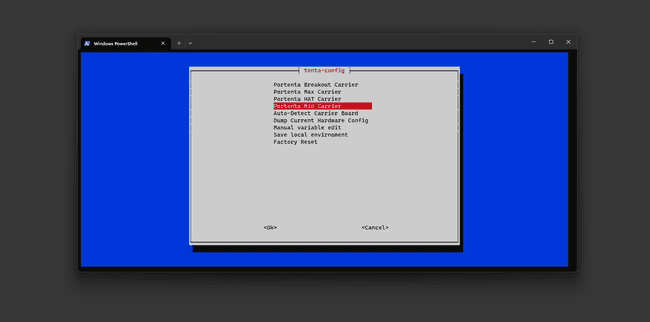
The image above shows the main window when accessing the
tenta-configThis tool simplifies hardware customization, allowing users to modify their setup without modifying the core device tree, which is essential for tasks like configuring display settings or activating specific hardware features.
To access the
tenta-configFirst, access the Docker container named x8-devel with the following command:
1docker exec -it x8-devel shThis command uses docker exec to start a new shell session inside the running x8-devel container. The
-itNext, search for the tenta_runner Python script by running:
1find / -name *.pyThis command recursively searches from the root directory for any Python script, helping locate utilities or applications spread across the system.
Once you find tenta_runner.py, navigate to its directory using:
1cd /root/examples/tenta-configThen run the script:
1python tenta_runner.pyThis command launches a GUI within the
tenttenta-config
If you have a Pro 4G Module or a GIGA Display Shield with the Portenta Mid Carrier, you can choose the
Portenta Mid CarrierYou can find more information on how to use the
tanta-configAdditional Tutorials
If you want to continue working with your Portenta X8, you can find tons of additional tutorials in the Tutorials section of our Arduino Docs. Please go check them out!
Working With Arduino
Working With Arduino IDE
In this section, you will learn how to upload a sketch to the M4 core on the STM32H747XI MCU.
Open the Arduino IDE and download the latest Arduino Mbed OS Portenta Boards Core following this tutorial. Then, select Portenta X8 from the board selector.

Create a custom sketch or open an example like the blink sketch:
1void setup(){2 pinMode(LED_BUILTIN ,OUTPUT);3}4
5void loop(){6 digitalWrite(LED_BUILTIN , HIGH);7 delay(1000);8 digitalWrite(LED_BUILTIN , LOW);9 delay(1000);10}
Select the device port and press Compile and Upload. The sketch is compiled into a binary, uploaded to the Linux side of the Portenta X8, and flashed by the RPC service running on Linux.
Please refer to the Communication Between Arduino and Linux section for details on how Remote Procedure Call enables this communication.
Once the upload is successful, the onboard LED of your Portenta X8 will blink at a one second interval.
If you prefer to upload the firmware manually, first compile the sketch by selecting Export compiled binary from the Sketch menu in the Arduino IDE. It will compile the sketch and save the binary file in the sketch folder. Alternatively, you can use the Arduino CLI to create an
elfYou can use the ADB tool installed as part of the Portenta X8 core to upload the firmware. It can be found at
Arduino15\packages\arduino\tools\adb\32.0.0From that directory, you can use the
adb1adb push <sketchBinaryPath> /tmp/arduino/m4-user-sketch.elf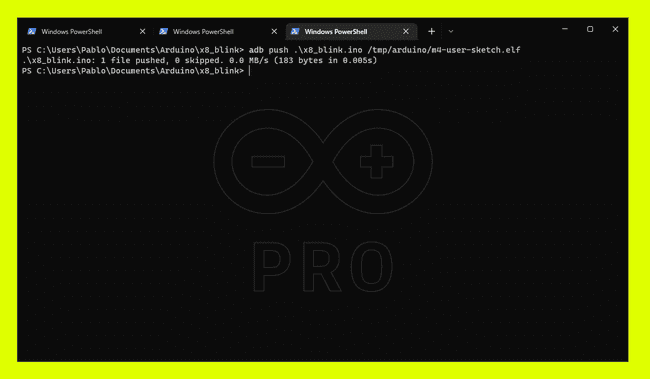
Communication Between Arduino and Linux
The Portenta X8 uses RPC (Remote Procedure Call) to exchange data between processors, allowing remote procedures or functions to run over a network while appearing as local calls.
In a client-server model, RPC supports distributed computing by treating procedure calls as client requests and return values as server responses. To ensure reliability, two semantics are used:
: Prevents duplicate execution if a failure occurs.At most once
: Guarantees at least one execution, even if repeated.At least once
The Portenta X8 relies on MessagePack-RPC for communication, supporting OpenAMP, SPI, Linux Char Device, and TCP/IP.
The M7 core of the STM32H7 manages data flow between the Linux and Arduino environments, working as an intermediary when the M4 core runs an Arduino sketch. At the same time,
m4-proxy

You can make interesting systems with the Arduino environment by leveraging the RPC communication between the Arduino and Linux layers. Check out this GitHub repository for examples of using RPC with the Portenta X8.
For further details about Remote Procedure Call and its implementation, please refer to this dedicated tutorial.
Advanced Arduino-Linux Integration
Build Arduino sketches for real-time tasks like sensor communication and Fieldbus management. Then, send data to the cloud or remote servers using Linux's networking capabilities.
For example, the Data Exchange Between Python® on Linux and an Arduino Sketch tutorial will help you understand how to exchange sensor data between the Python® container embedded on Portenta X8 and an Arduino sketch.
If you are a more advanced user, you can check Multi-Protocol Gateway With Portenta X8 & Max Carrier tutorial on developing your multi-protocol gateway. It aims to receive data from a sensor with the Arduino layer via MQTT protocol, take advantage of RPC to establish communication between Arduino and Linux, and then send the acquired data to The Things Network via LoRa®-based network managed by the Linux layer.
Working With Portenta X8 Board Manager
The Portenta X8 Board Manager helps you keep your Portenta X8 Linux image and containers up to date, even remotely, using Over-The-Air (OTA) updates via wireless connectivity.
An Arduino Cloud for Business plan with a Portenta X8 Board Manager subscription is required to enable these features.
Using the Portenta X8 Board Manager is optional and not required for the Portenta X8 to function. It leverages Foundries.io's infrastructure to enable features like secure Over-The-Air (OTA) updates for the Portenta X8 OS and applications. While it simplifies development and management processes, it is not a mandatory component.
For more information on configuration and environment exploration, please refer to the Portenta X8 Board Manager section at the beginning of the user manual.
Device And Fleet Management With Portenta X8 Board Manager
Verify that your Portenta X8 is correctly added to your FoundriesFactory by checking if it is listed among the available devices under the Devices section.
If you want to check if your Portenta X8 is updated according to the latest available Target (i.e., update), you can check the bulb's color under the status column. There are three main color options:
| Bulb color | Meaning |
|---|---|
| Green | Device online and updated |
| Yellow | Device online and not updated |
| Red | Device offline and not updated |
In this case, the Portenta X8 is connected to the network (and to the FoundriesFactory) but has not been updated.
You can see the Target uploaded on your device under the Target column, i.e., portenta-x8-lmp-569, and get additional information about what is included in this specific Target by clicking on it.

The above window also shows you all the container apps you have installed on your device, and you can start using them.
If you scroll down in the same window, you can also look at the update history of that specific device.

You can now compare the Target uploaded on your Portenta X8 with the Target available in the Targets section and decide whether to update your device.

Learn how to update your Portenta X8 with your FoundriesFactory by checking the dedicated section of this user manual.
This Target page contains the Linux images built each time something is committed in the repositories available under the Source section. In this section, you can find the four repositories that are used to customize the images:
- ci-scripts.git: Scripts that define the platform and container build jobs on the FoundriesFactory system.
- containers.git: This is where containers and docker-compose apps are defined. It allows you to define which containers to build/deploy and how to orchestrate them on the platform.
- lmp-manifest.git: The repo manifest for the platform build. It defines which layer versions are included in the platform image. This includes meta-partner-arduino, the layer containing Arduino-specific customizations (machine definition, device drivers, etc.).
- meta-subscriber-overrides.git: OE layer that defines what is included in your FoundriesFactory image. You can add board-specific customizations and overrides or add and remove packages provided in the default Linux microPlatform.
Committing to lmp-manifest.git or meta-subscriber-overrides.git repositories will create a platform Target, i.e. base Linux platform image. On the other hand, committing to containers.git will create a container Target, including all the containers and docker-compose apps you would like to upload on your Portenta X8.
Both these Targets will generate the artifacts specified in the ci-scripts.git, which includes all the required files to program the Target in case of platform build.
RBAC With Portenta X8 Board Manager
You do not have to be the only one in your organization with permission to update your Portenta X8 devices. The FoundriesFactory integrates a Role-Based-Access-Control functionality (RBAC) to allow users to add multiple teams with multiple members each.
You can start defining a new team by clicking the Teams section.

The level of access and specific permissions are defined by the team’s role in the FoundriesFactory. As you can notice from the image below, multiple roles and permissions are available.

Once you created the team, you can go to the Members section of your FoundriesFactory to invite new members to the team.

You can type the email addresses of your teammates, and they will receive an automatic email with the invitation to join the corresponding team in your FoundriesFactory.
FoundriesFactory FIOCTL
The FoundriesFactory includes a command line tool called FIOCTL, which allows you to manage your Portenta X8 through your CLI.
With this tool, you can easily upload containers to a board linked to your FoundriesFactory just by stating the FoundriesFactory name, the board name, and the app you would like to upload.
Learn how to use this tool by checking the dedicated tutorial at this link or the corresponding Foundries documentation.
Pins
In order to learn how to properly call GPIOs or other peripherals both in the Arduino environment or in Linux, with or without a carrier, you can check the following pinout diagrams:
- Portenta X8 pinout
- Portenta Breakout pinout
- Portenta Max Carrier pinout
- Portenta Hat Carrier pinout
- Portenta Mid Carrier pinout
Communication
In this section, you will learn how to make your Portenta X8 communicate with multiple types of sensors or other external devices, leveraging the wide variety of supported interfaces:
SPI
In this case, a Portenta X8 with a Portenta Breakout board is used to connect an external SPI device.
SPI With Linux
You need to enable SPI support before using SPI devices.
Open Portenta X8 Shell as explained here.
With root privileges on the Portenta X8, you can enable the SPI device interface by loading the
spidev1sudo modprobe spidevTo ensure the
spidev1echo "spidev" | sudo tee /etc/modules-load.d/spidev.conf2sudo systemctl rebootTo set up a service named
my_spi_service/dev/spidev0.01services:2 my_spi_service:3 devices:4 - "/dev/spidev0.0"This configuration is typically added to a docker-compose.yml file, allowing the service to interact with the specified SPI device.
If the Linux user on which the container is running is not
rootentrypoint.shDockerfiledocker-compose.yml1#!/usr/bin/env sh2
3# entrypoint.sh example4
5chgrp users /dev/spi-*6chmod g+rw /dev/spi-*7usermod -aG users <container user>8
9# Possible command to execute your application as a non-privileged user with gosu10# Check https://github.com/tianon/gosu for more information11gosu <container user> /usr/bin/python my_spi_service.pySPI Port Mapping
| Linux | Arduino Portenta Breakout |
|---|---|
| 134 | |
| 135 | |
| 136 | |
| 137 | |
SPI With Arduino
The
SPI| SPI Pin | Arduino Portenta Breakout |
|---|---|
| CIPO | Pin 0 (Header GPIO0) |
| COPI | Pin A6 (Header Analog) |
| SCK | Pin A5 (Header Analog) |
| CS | Pin 1 (Header GPIO0) |
I2C
In this case, a Portenta X8 with a Portenta Breakout board is used to connect an external I2C device.
I2C With Linux
You need to enable I2C support before using I2C devices.
Open Portenta X8 Shell as explained here.
With administrative (root) privileges on the Portenta X8, you can enable the I2C device interface using the following command:
1sudo modprobe i2c-devUse the following commands to ensure the
i2c-dev1echo "i2c-dev" | sudo tee /etc/modules-load.d/i2c-dev.conf1sudo systemctl rebootThese commands activate and configure the I2C device interface on the system. The following section demonstrates how to set up I2C services within a Docker environment by defining them under
my_i2c_service1services:2 my_i2c_service:3 devices:4 - "/dev/i2c-0"5 - "/dev/i2c-1"6 - "/dev/i2c-2"7 - "/dev/i2c-3"You can configure I2C services for all available interfaces (from 0 to 3) or specify particular services as needed.
If the Linux user on which the container is running is not
rootentrypoint.shDockerfiledocker-compose.yml1#!/usr/bin/env sh2
3# entrypoint.sh example4
5chgrp users /dev/i2c-*6chmod g+rw /dev/i2c-*7usermod -aG users <container user>8
9# Possible command to execute your application as a non-privileged user with gosu10# Check https://github.com/tianon/gosu for more information11gosu <container user> /usr/bin/python my_i2c_service.pyI2C Port Mappings
| Linux | Arduino Portenta Breakout | Notes |
|---|---|---|
| | |
| | Recommended |
| |
Examples
Within the Portenta X8 shell, you can quickly test I2C communication with compatible devices using specific commands. To list all connected I2C devices, use:
1i2cdetect -y <I2C bus>To interact with a specific I2C device and retrieve data, the command format is:
1i2cget -y <I2C bus> <device address> <register address>For example:
1# List I2C devices on bus 22i2cdetect -y 23
4# Read data from a device at address 0x77 on bus 2, register 0xD05i2cget -y 2 0x77 0xD0
If a BME280 sensor is connected to I2C0 and the above commands are used, the Portenta X8 will show
value to tell the sensor is alive.0x60
Here are some simple examples of implementing I2C communication on the Portenta X8 with Portenta Mid Carrier using Python.
The following code uses the SMBus (System Management Bus) protocol, with SMBus-compatible libraries, to read a data byte from a device on
/dev/i2c-3Examples of using SMBus-compatible libraries:
1from smbus2 import SMBus2
3# Connect to /dev/i2c-34bus = SMBus(3)5b = bus.read_byte_data(80, 0)6print(b)
The next example shows how to initialize the I2C bus using the smbus2 library and read multiple bytes from a device. The
read_i2c_block_data1from smbus2 import SMBus2
3# Initialize the I2C bus4bus = SMBus(3) # 3 represents /dev/i2c-35
6device_address = 0x17num_bytes = 28
9# Read from the I2C device10data = bus.read_i2c_block_data(device_address, 0, num_bytes) # Starting address is 0 to read from11
12# Data is a list of bytes13for byte in data:14 print(byte)The following example shows how to write data to an I2C device using the smbus2 library. A data byte (
valuedevice_address1from smbus2 import SMBus2
3# Initialize the I2C bus4bus = SMBus(3) # 3 represents /dev/i2c-35
6device_address = 0x17instruction = 0x008value = 0xFF9
10# Write to the I2C device11bus.write_byte_data(device_address, instruction, value)In the following example, the python-periphery library is used to communicate with the I2C device. This library integrates a broad range of protocols within the same script. The
I2C.transfer()The code reads a byte from an EEPROM at address
0x500x1001from periphery import I2C2
3# Open i2c-3 controller4i2c = I2C("/dev/i2c-3")5
6# Read byte at address 0x100 of EEPROM at 0x507msgs = [I2C.Message([0x01, 0x00]), I2C.Message([0x00], read=True)]8i2c.transfer(0x50, msgs)9print("0x100: 0x{:02x}".format(msgs[1].data[0]))10
11i2c.close()I2C With Arduino
The
WirePWM6SCLPWM8SDASince one of the
I2Csetup()I2C1void setup() {2 pinMode(PA_12, INPUT);3}UART
In this case, a Portenta X8 with a Portenta Breakout board can be used to explore UART communication. The Portenta Mid Carrier and Portenta Hat Carrier also provides the capability to use the UART communication.
UART With Linux
A standard UART is available as
/dev/ttymxc1UART1With root access on the Portenta X8, you can list the available serial ports in Linux using the following command:
1ls /dev/ttyUSB* /dev/ttyACM* /dev/ttymxc*2
3// Example output:4/dev/ttyUSB0   /dev/ttyUSB2   /dev/ttymxc1   /dev/ttymxc35/dev/ttyUSB1   /dev/ttyUSB3   /dev/ttymxc2
Common serial devices are typically labeled as /dev/ttyUSBx, /dev/ttyACMx, or /dev/ttymxcx. For instance, you might see /dev/ttymxc1 listed.
The following Python script uses the pyserial library for UART communication. The processData function is defined to handle incoming data, which can be customized according to your needs.
1import serial2import time3
4# Define the processData function (customize based on your requirements)5def processData(data):6    print("Received:", data)  # Currently, it just prints the data. Modify as needed.7
8# Set up the serial port9ser = serial.Serial('/dev/ttymxc1', 9600)  # Replace with the correct port and baud rate for your setup10
11incoming = ""12
13while True:14    # Check for available data and read individual characters15    while ser.in_waiting:16        c = ser.read().decode('utf-8')  # Read a single character and decode from bytes to string17
18        # Check if the character is a newline (line-ending)19        if c == '\n':20            # Process the received data21            processData(incoming)22
23            # Clear the incoming data string for the next message24            incoming = ""25        else:26            # Add the character to the incoming data string27            incoming += c28
29        time.sleep(0.002)  # Delay for data buffering, similar to Arduino's delay(2);
This script maintains a serial connection on /dev/ttymxc1 with a baud rate of 9600. It reads incoming data character by character until it encounters a newline (
\nAfter processing the data, the script resets and is ready for the next message. The
time.sleep(0.002)delay(2);Bluetooth®
Portenta X8 supports Bluetooth® connectivity just on the Linux side.
In order to communicate with Bluetooth® devices via the Portenta X8 Shell, you can use the Bluetooth® utility bluetoothctl. These are some of the most used commands:
to list all the available Bluetooth® devicesbluetoothctl devices
to pair with a specific device through its MAC addressbluetoothctl pair [mac_address]
to connect to a paired devicebluetoothctl connect [mac_address]
to disconnect from a paired devicebluetoothctl disconnect [mac_address]
Do you want to send data from your Nicla to Portenta X8 via BLE? Check this link to get started.
Support
If you encounter any issues or have questions while working with the Portenta X8, we provide various support resources to help you find answers and solutions.
Help Center
Explore our Help Center, which offers a comprehensive collection of articles and guides for the Portenta X8. The Arduino Help Center is designed to provide in-depth technical assistance and help you make the most of your device.
Forum
Join our community forum to connect with other Portenta X8 users, share your experiences, and ask questions. The forum is an excellent place to learn from others, discuss issues, and discover new ideas and projects related to the Portenta X8.
Contact Us
Please get in touch with our support team if you need personalized assistance or have questions not covered by the help and support resources described before. We're happy to help you with any issues or inquiries about the Portenta X8.
Trademark Acknowledgments
- LoRa® is a registered trademark of Semtech Corporation.
Suggest changes
The content on docs.arduino.cc is facilitated through a public GitHub repository. If you see anything wrong, you can edit this page here.
License
The Arduino documentation is licensed under the Creative Commons Attribution-Share Alike 4.0 license.